
Common orange lichen, 2.5:1 stack, Heesch
In my previous post...
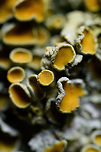
...I introduced my new 2.5 - 5x macro lens and some of the big challenges in working with it. The previous photo showed a very tiny depth of field at about 0.1mm. To cover (much) more depth, stacking is a requirement.
So to make a long story short, I invested in stacking gear. Specifically, the WeMacro automated rail. This is a machine on which you put your camera, and then it moves it forward or backward automatically, by steps as small as 1 micron (0.001 mm). The rail includes a shutter cable which goes into the camera. Next, you can control the rail in a number of ways, using a mobile app, a Windows app, or the way I'm using it, using the Helicon Remote software.
As a summary of how this works: on my computer monitor, I'm directly looking at the live feed of the camera. Parts in focus are marked blue. I can press forward/backward to move the rail slightly, until I find the start of the stack. Next, I move the rail backwards until I find the point that I want to be the end of the stack.
Finally, I input the amount of steps/photos to take between these points, and press start. The entire process of taking the photos and moving the rail is fully automated. I typically leave the room and let it run, also to avoid vibrations.
If you're on Facebook, this video shows the setup in action:
https://www.facebook.com/ferdy.christant/videos/10158019291547692/
The end result will be a few dozen images taken, which are then loaded into another program, Helicon Focus. Here you can blend the photos into a single image.
Stacking is tedious and painful, even with this machine, although it does take away the biggest time sink. The big upside is something macro photographers are not used to: depth of field no longer matters. If you want more, just add more steps to the stack.
Likewise, normally with 1:1 macro you would try to align with the subject, to maximize depth of field. With stacking, this is not necessary. You can take an odd diagonal angle and get full depth of field across the scene. So you have to basically unlearn some constraints of non-stack macro photography.
And finally, another cool implication of deep stacking is that you can generate multiple images from the same stack. In this example, I did a full start to end stack, everything is in focus in the combined image. However, if I keep the individual stack images, I can now also produce an entirely new image that would only cover the first half of the depth of field, should I like that result better.
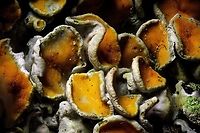
3.5:1 macro:
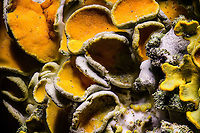
5:1 macro:
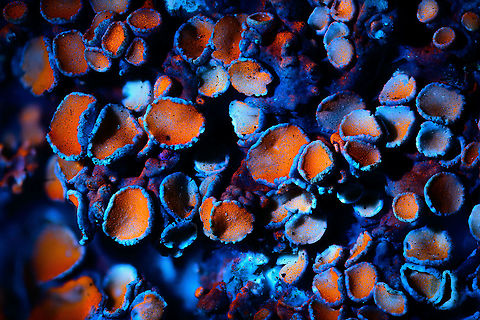
Xanthoria parietina is a foliose, or leafy, lichen. It has wide distribution, and many common names such as common orange lichen, yellow scale, maritime sunburst lichen and shore lichen. It can be found near the shore on rocks or walls (hence the epithet parietina meaning "on walls"), and also on inland rocks, walls, or tree bark.
