 Promoted
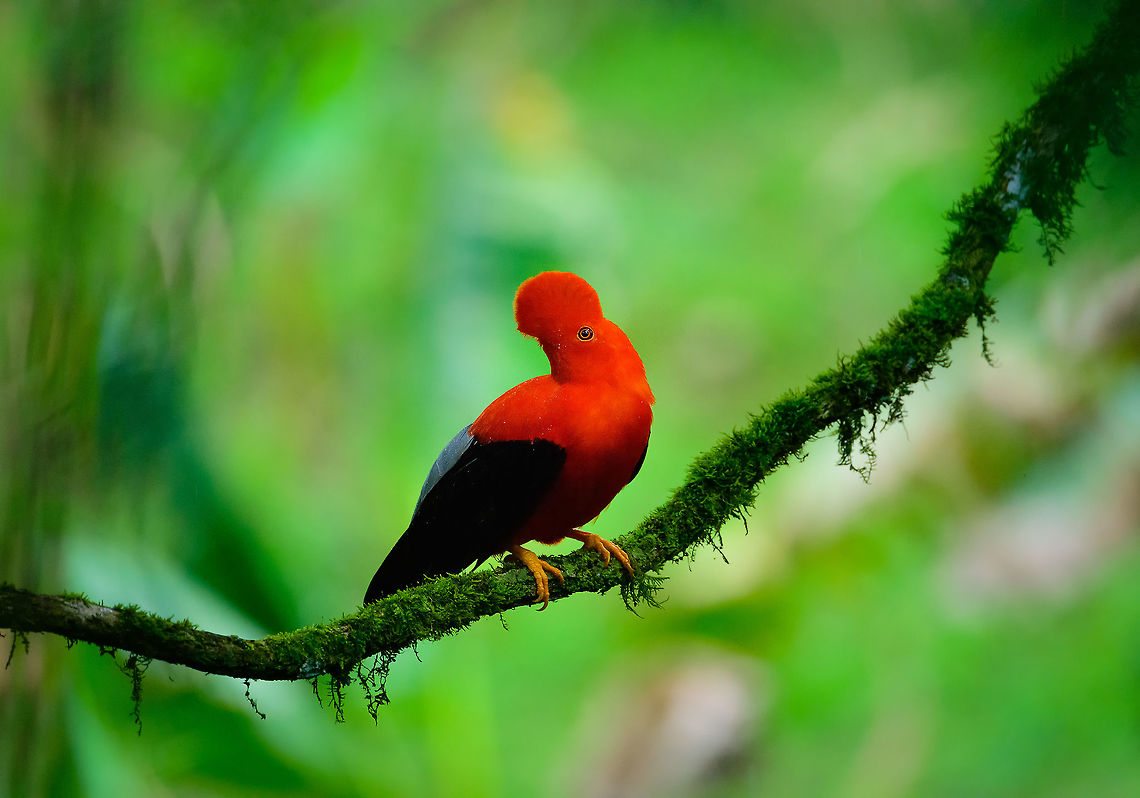
Andean cock-of-the-rock - perched II, Jardin, Colombia
This is Henriette's favorite bird so we went to a place that gives really good odds of seeing them: the cock-of-the-rock reserve in Jardin. This reserve is simply a large forested garden operated by a nice old lady. There are no fences or nets, so the birds chose to be here. On any given day, you can see as little as 1 or as many as 30 cock-of-the-rocks. Almost all are males which are known for their loud and extravagant courtship displays.
I think we saw about 8 males, and no females. It's a very fun, loud and entertaining sight to see these males go nuts. They are constantly head-banging and loudly calling. They are of course all known for their appearance, in particular the disc-like crest that gives the illusion of the bird having a protruded head, and no beak. I'll be sharing many shots, get ready for lots of RED!


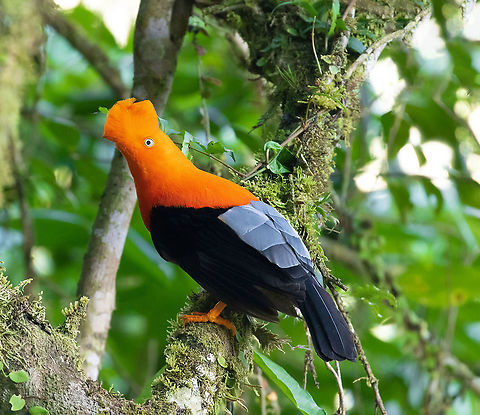
The Andean cock-of-the-rock is a medium-sized passerine bird of the Cotinga family native to Andean cloud forests in South America. It is widely regarded as the national bird of Peru. It has four subspecies and its closest relative is the Guianan cock-of-the-rock.

comments (16)
https://www.tripadvisor.com/ShowUserReviews-g2035190-d8822060-r463219174-Gallito_de_Roca_Preserve-Jardin_Antioquia_Department.html Posted 7 years ago
Posted 7 years ago
Posted 7 years ago, modified 7 years ago
I really don't like to use my 1.4 extender, I am kind of forced to do so as on these trips I need the range. It means my aperture at full focal length *starts* at f/8, which is quite bad. Add to that the poor light in forests and you get an ISO this high.
I've done testing in my garden prior to this trip. The extender does soften the results, yet this is at 100%. True, with giant resolution sensors like this, shooting sharp at 100% is nearly impossible, but for birding you don't need to get this sharp as you don't crop in so far. I mean, I crop almost every bird shot, but not up to 100%.
This image is definitely noisy. Click on it to open full screen, then click "load original", and then zoom in on the branch. As you probably know, noise pretty much disappears when you scale down far enough, and in part that is what's happening here. But lots of other things are at work, continuing in the next comment. Posted 7 years ago, modified 7 years ago
The Nikon 8XX is simply a better sensor as far as noise and dynamic range. The pixel pitch is larger so the issue of shake and motion blur is reduced as well. All factors that effect sharpness on the 5Ds R and I believe is the largest impact on lack of sharpness. Posted 7 years ago
The feet show the true sharpness under these conditions, and this shows that at 100% it is quite soft, yet when zoomed out it does look sharp enough. The counter intuitive thing here is that if you're not cropping, you probably should raise contrast and blacks during post. At 100% they make noise even worse, yet when zooming out to a normal size, the good parts (local contrast) survives, and the noise does not. This is oversampling at work, which is also the main technique used in smartphone cameras.
Discussing post processing in next comment... Posted 7 years ago, modified 7 years ago
First, my typical flow based on the scenario of a dark forest, with f/8 and ISO 3200 or higher. If it's no super spectacular bird or pose, I give it the quick treatment.
In LR, use the radial filter and drag the shape roughly around the subject. Set a high 'feather'. Now we'll work on the sliders. Everything you will now manipulate, will affect anything *outside* the shape. Now I set a noise reduction of about 50.
In most cases, you're done. The background now has most noise removed or reduced yet we're keeping noise on the subject. When zooming out, the subject appears sharp and is contrasting with the background. You can tune a bit more with this technique, for example lower the exposure outside the shape, decrease sharpness, etc.
Extra tip: when done with the radial filter, click the tool again and select the existing selection (shown as a circle). Right-click and "duplicate". On the new one, click "invert". Now you're working on the inside of the selection. I sometimes use this for very dark subjects.
The above process is very effective when you don't crop too deeply. I can PP an image in 30 seconds this way. It is not perfectly accurate due to the sloppy selection, but nobody can tell, unless you're printing a giant poster.
Which brings me to this image, which I actually did print as a mega poster. So this one got the extra treatment, which means using the brush tool to make careful selections to reduce noise, increase contrast, etc. Therefore I do not consider this image typical. Posted 7 years ago
I would love to see an untreated sample image of this. Modern high-end DSLRs like yours should have workable results up to 6400. Performance nowadays should be so good that the attitude is shifting: photographers stop obsessing over low ISO, instead focus on an sharp shot no matter how high the ISO, using the aperture of your choice. Quite different from 10 years ago, where everybody wanted to keep it below 400, even if it means missing the shot.
So I'd like to understand the noise you discuss. Whether it's only a 100% crop issue or a wider issue. Let's see if we can get to the bottom of this, ISO 1600 should not be a problem nowadays. Posted 7 years ago
I sent you a dropbox link with a ISO 1600 image via email. Very doable but I know the 5Ds R is noisy for this type of close up or heavy crop photography where sharpness is critical. Not to mention the pixel pitch (4.14 microns) issue on motion blur. Posted 7 years ago
As to whether your combination is soft compared to other setups, that would require a very detailed lab-like comparison. You seemed to have pretty good light in your scene, so the result is somewhat soft, but definitely not dramatically soft or very unusual. Posted 7 years ago