
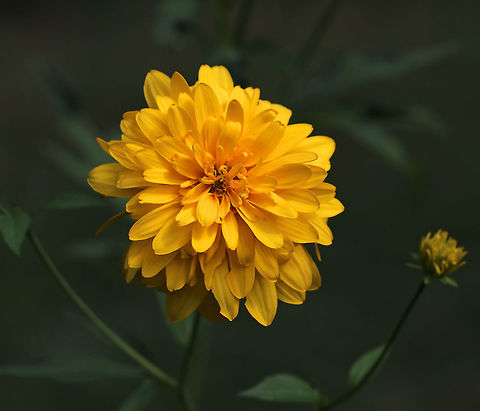
"Rudbeckia laciniata", commonly called cutleaf coneflower, is a species of flowering plant in the aster family. It is native to North America, where it is widespread in both Canada and the United States. Its natural habitat is wet sites in flood plains, along stream banks, and in moist forests.
Similar species: Asterales
By Christine Young
All rights reserved
Uploaded Aug 27, 2019. Captured Aug 26, 2019 13:30 in 281 Main St S, Woodbury, CT 06798, USA.

comments (15)
If you did not use flash, I can confirm there was lots of light. I can tell by the shutter speed. 1/500s is a fast shutter speed. If in only 1/500s the sensor receives enough light to shoot at a low ISO 100 at f/5.6, there simply is plenty of light in the scene, or even a surplus. So it's not the scene being dark.
I'd say the issue (if you consider it an actual issue) is light metering. I am assuming that you're not shooting in manual mode, instead using aperture priority mode, shutter priority mode, or fully automatic mode. In any of these non-manual modes, light metering applies.
When you focus (pressing shutter button half-way), the camera measures the light (brightness) of the subject you have focused on. Based on that measurement, it will adjust the exposure (shutter speed, ISO, aperture...depending on which mode you're shooting in) to come to what it "thinks" is a balanced exposure. This automatic process will often/usually work out fine, yet there are cases in which it fails, and the camera needs a little "help". Let's explore some examples to understand how it can go wrong:
- Snow. Focus on snow. The light meter will go nuts. It will think the scene is hugely overexposed, and as a result will compensate by lowering the exposure. This is why so many snow photos have grey snow, instead of the pure white you actually saw.
- Black bird (or other dark subject). Focus on the black bird. The light meter will go nuts. This time it will think it's a super dark scene and up the exposure of the entire scene, leading to a super bright background.
- Sunsets, or basically any landscape. Focus on the sky, the light meter will detect it as quite light and lower the exposure, making the land itself too dark. Focus on the land instead, it will think it is too dark, up the exposure, yet now the sky is overexposed.
My theory is that the same thing happened here: you focused on a pretty bright subject (core of flower in good light) and the camera considered it overexposed, so it lowered exposure, leading to a darker background.
Solutions in part 2 of my reply... Posted 6 years ago
1. Simple but can be effective: scene modes. You can tell a camera what kind of scene you're shooting. For example "landscape". It will then have more intelligent exposure calculations. It would not have helped you in this case. Also note that you will lose control of anything in scene mode.
2. Review your light metering mode. Most cameras allow you to control how much area the camera should consider in metering light. Consider that black bird again. If the light metering area would be larger, it would measure the bird plus part of the background. Light measured would be much more balanced, an average of foreground and background. In your scene, this could have helped. Check this image to see the typical options:
https://d36tnp772eyphs.cloudfront.net/blogs/1/2012/12/Metering-Modes-Matador-SEO.jpg
3. Exposure compensation. This is in many cases the quickest and most practical way to fix exposure. Image too dark on LCD? Just turn the dial for a +1EV. Too light? -1EV. You can go in small or big steps to get it just right. The problematic "snow" scene discussed earlier would be easiest to fix this way. If you're unsure if exposure is correct, the histogram is a useful helper.
4. Post processing: fix afterwards. Not much of an option with a JPEG, but RAW provides a lot of working space to fix exposure afterwards.
So, the solution depends on the scene, and this is a long winded answer. But I can make it considerably shorter. Your go-to solution for a dark exposure would be exposure compensation. This best supports your varied, spontaneous shooting. Just keep shooting as you do, and do per-scene exposure compensation corrections as you see fit. This will also respect your choice of aperture.
Edit: exposure compensation works across photos, so don't forget to undo it! Posted 6 years ago, modified 6 years ago
Happens to me all the time to forget to undo settings. Posted 6 years ago
- Aperture (size of opening of lens)
- Shutter speed (time shutter is open to collect light)
- ISO (sensitivity of film, or in digital: amplification of signal)
...and we know that each of these parameters are connected. Changing one affects the other. So what is this magical 4th exposure parameter called "exposure compensation"?
It doesn't really exist, it's just a shortcut. Say you're shooting in aperture mode, and then do a +1EV exposure compensation, what really happens is that your camera will adjust shutter speed. It will do it at exactly the factor needed to make the *total* exposure 1 stop brighter.
You could have achieved the +1EV by adjusting shutter speed yourself. Yet if you were in aperture mode, you really can't, it's only possible in manual mode or shutter priority mode. Plus, you would have to do the internal math.
Same for shutter speed priority mode. Here an exposure compensation would lead the camera to change your aperture instead.
So, exposure compensation is not a 4th parameter, it still uses the exposure triangle. The benefit is that it's simple to reason about. "Make it brighter" -> and let the camera figure out how, whilst still respecting your priority mode (either aperture or shutter). Much simpler and faster than doing the math in your head.
Posted 6 years ago
"the subjects look much darker than they were in nature"
That's because your eyes are vastly superior in detecting contrast and dynamic range compared to a camera's sensor. A telling example of this is when you walk in a forest say around 2 hours before sunset. To your eyes, it appears as still pretty normal daylight. You can easily still see individual subjects, their details. To a camera's sensor, the same scene is already very dark. It doesn't even have to be 2 hours before sunset, in a dense forest it's always dark from the sensor's perspective.
A more telling and simple example is a sky full of stars. After a minute or so of adjusting to darkness, your eyes can see thousands on a clear night. Wait a few minutes more and your eyes get to detect even more.
In the same scene, the camera's sensor basically sees nothing at all, just darkness. Unless you expose for 20 seconds or more and use a high ISO.
The science behind how many "stops" the eye can see is complex and I'm by no means an expert, but findings estimate the amount of stops the human eye can see is 20-46 stops, whilst a camera can "see" about 10-14.
20-46 is a big range, explained by the fact that the human eye works vastly different compared to a camera's sensor. Light detection is relative, not absolute, and adjustable.
I don't want to go any further as I'd likely make a fool out of myself, but I hope this helps to explain why what YOU see is not what your camera's sensor sees. Posted 6 years ago
Btw, I nearly always shoot in program mode because I like to control the ISO. Sometimes I use AV. Posted 6 years ago
Still, I'd like to explain why I prefer Av control over ISO control myself. In particular with macro photography, I consider aperture the most important factor. It directly impacts depth of field which is critical. Aperture is therefore the dominant creative parameter of the photo, it's the difference between having too little, enough, or too much in focus.
ISO has no creative value. It is purely a technical parameter that we want to keep as low as we can, yet it does not directly influence composition, depth, sharpness. Therefore I consider ISO secondary.
When I use flash, I set ISO at 64, the lowest possible since there's always enough light. When I don't use flash, I let the camera calculate what is the lowest ISO it needs given a minimum shutter speed. It could be 100, it could be 400, anything really. I will accept whichever value as aperture is more important than ISO. ISO is simply the result of my chosen aperture.
But surely that's not the only way to deal with it. You can also shoot ISO-dominant and instead of controlling aperture, control your distance to the subject, as this also affects depth of field. Or, you can control both factors, which is possible in P mode. Or, your photo is non-macro where aperture is less important.
No rights or wrongs, really.
Posted 6 years ago